|

| |
|
FUN CAMP CO.
SLEEPER TIPI - ASSEMBLY INSTRUCTIONS |
|
The
following
step-by-step
instructions will help you successfully assemble a Fun Camp Co. Sleeper
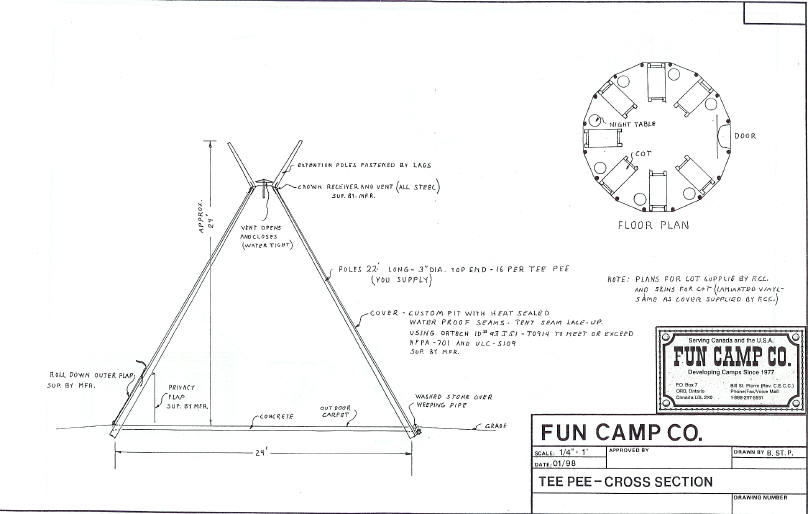
Tipi. With these instructions you should have three pages of 20 color
illustrations and a drawings of a tipi cross section, tipi sign and tipi
bed cot.
|
|
STEP - 1 Preparing the poles.
The poles
should be of straight cedar, pine or tamarack. The length is 22'- 6" and
the small end should be slightly under 3". If the poles are peeled when
fresh cut they will peel clean and with ease. A three inch 1.0. pipe is
supplied with the tipi's which is the same size as the pipes in the
receiver. Make sure it slides easily over the small end. Sizing of the
small end and knot removal can be easily done with an electric plane. It
is a good idea to dip the large end in a wood preservative for up to
about 8".
|
|
STEP - 2
Laying out the circle. Establish a
center for the Tipi. If
sand or gravel is needed for under the slab, now is
the time as it is the last time a truck can back to this location. Set
in the center, a strong stake with a nail in the center. layout from
this center, a 24'
circle, dividing the circumference int016 divisions (
approximately 56 1/2" each ). Mark each intersection with a 12"
spike.
|
|
STEP - 3 At the half circle
intersections ( slightly inside ), drive in substantial stakes. All
poles are not straight. Set poles with the curved side out so that the
weight will make the poll lay
straight. Set the bottoms of two poles up
against these stakes and the small ends on a 1"x 6" x 6' supported off
the ground with saw horses. Insert the small ends of the poles into the
appropriate receiver pipes ( making sure
they go all
the way in ) and then screw in each a 1/4"x 2" lag screw. Nail (
from under) the 1"x 6" to poles. For safety put small stakes on each
side of the large end or tie with a rope, to prevent them from slipping
off the large stake. The
structure is ready to raise... |

This is an excerpt from the detailed instructions
that will come with your Tipi.
|
